Zusammengesetzte Bilderstreifen

Diese Funktion erlaubt es, eine Anzahl von Bildern zu einem einreihigen Bildstreifen oder einem Paar von Bildstreifen zu verbinden.
Eine Verwendung ist zum Beispiel das Verbinden von Bildern die durch ein Paar rotierender "virtueller Kameras" mit 3D-Modeling-Software wie Bryce und PovRay erzeugt wurden.
Damit kann man Stereo-, 360-Grad-Panoramen, die in kontinuierlicher Rotation mit SPM betrachtet werden kann, produzieren.
Zum ersten Mal kann man solche Panoramen betrachteten, ohne dass man Win2000/XP und teuere, quad-buffered OpenGL-Grafikkarten (wie Quadro) benötigt.
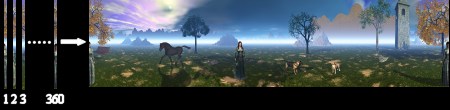
(Das obige Bild mit freundlicher Genehmigung von Steve Boddy © )
Die Bilder müssen fortlaufend nummeriert werden, damit die Sequenz läuft vom linken zum der rechten Bild.
Es sollte keine Überlappung in den Quell-Bilder geben.
Man kann alle oder ausgewählte Dateien zu verbinden, und den Namen und das Verzeichnis für das Ziel angeben.
(Die kommerzielle Nutzung dieses Verfahrens kann durch Patente beschränkt sein.)
Eine andere Verwendung für "Mosaikbilder" sind die Erstellung von Stereo-Panoramen mit einer einzigen Kamera die sich um einen Punkt dreht dahinter zu schaffen.
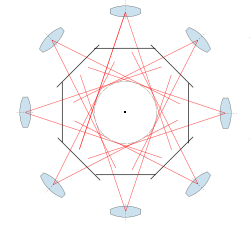

The above animation shows light rays (in red) emerging from the rear of the camera lens and directed towards the sensor plane (the black line).
The sensor will almost certainly not be film because of the large number of images required.
A 'virtual camera' with similar geometry may be setup in '3D' (not stereo) programs such as Bryce, PovRay, etc.
In this example, the rays are directed to positions at approximately 25% and 75% of the image width.
As the camera rotates around the black dot, you can see that the projection of those lines is tangent to a 'viewing circle' (shown as a gray dashed line).
It is the diameter of that viewing-circle that gives us the required stereo disparity for a narrow strip of the image.
Uniquely, the disparity can be altered after the images are taken.
We simply have to take a sufficient number of strips and 180 or 360 are recommended for a 360 degree panorama.
The latest digital cameras often have a good quality 640x480 movie mode (if suitable compression was employed)and in that case
it is recommended that you use VirtualDub to extract a suitable number of frames.
With a 1RPM motor and shooting at 30fps, you will produce 1800 frames.
Use VirtualDub to reduce framerate to 6 fps and save the resulting 360 frames in a folder as an image-sequence.
Digital camera movie-mode is normally fully-automatic and you are not able to lock the exposure.
Higher-resolution images are better taken with stepper-motor control although you could try manually rotating the camera on a tripod.
Equal increments of rotation are not essential, they simply make the process easier and quicker.
You may of course create partial panoramas or simply scan a subject of interest.
For minimal manual editing, a stepper-motor driven platform is required or a motor geared-down to about one revolution per minute.
Such motors are inexpensive.
You may even experiment with simply holding the camera and rotating your arm for rotations of less than 90 degrees.
-
Bestimmen der Streifenbreite
Zunächst eine neue Bilderschau-Liste erstellen und die ausgewählten Bilder einfügen.
Die Option "Panorama" aktivieren SPM erstellt dann eine Liste von benachbarten Bildpaaren (1,2, 2,3, 3,4, usw.).
Als nächstes "Bilderliste öffnen" wählen und zu dem Verzeichnis mit der obigen Liste zu navigieren und bei Bedarf eine Teilmenge der Quelle-Bildern wählen.
Die Option "Autostart Bilderschau" deaktivieren und vor dem Öffnen der Liste die Stereoanzeige °Farb-Anaglyphe" wählen.
Wenn das Ausschalten von Autostart vergessen wurde, die Taste [A] drücken, um die Bilderschau zu stoppen.
Mit der linken und rechten Pfeiltasten, um ein beliebiges Paar benachbarter Bilder überlagern und so einstellen, dass insgesamt die Rot und Cyan Fransen minimiert werden.
Die Tasten [Umschalt+Y] drücken, um die Korrekturwerte für alle Bilder zu speichern.
Bei Aufnahmen aus der Hand oder bei unpräziser Motoristeuerung kann die Breite jedes Streifens leichte Korrekturen benötigen und man muss die Bilder einzeln einstellen.
Die Taste [Y] drücken, um den neuen Wert in die Bilderschau-Liste zu schreiben.
Sicherstellen, dass die letzte Ausgabe der ersten Bandbreite richtig und ein negativer Wert (in der Diashow-Liste, nicht auf dem Bildschirm) ist.
Man kann dann schnell Schritt für Schritt (mit [Rückschritt] oder [Leertaste]) alle Frames visuell überprüfen ob die vorgeschlagene Streifen-Breiten stimmen.
-
Bestimmen der Streifenposition
This will determine the disparity of the mosaic, strips nearer the middle of the image giving less disparity.
Strips exactly at the middle will be identical (zero disparity).
Select 'Mosaic Images' and choose files of type 'Slide Show List'.
Select the slideshow list described above.
Initially, choose positions at 25% and 75% of image-width.
For example, for a 640x480 source-image, check 'Crop' in the above dialog-box and 160,0 for crop top-left.
Enter X,480 for crop bottom-right, where 'X' is any value as it will not be used by SPM.
(SPM knows the strip width from the values in the slideshow list).
Checking 'Symmetrical Cropping' will select a second strip of the same width and same distance from the center.
For stereo panoramas, symmetrical cropping is desirable but not essential.
If you have previously determined the barrel distortion factor for the lens used, you may apply that to each source-image.
A number of pixels of overlap may be entered if desired.
-
Zusammensetzen der Bildstreifen
Enter the path to the destination folder for the 'Output File' and accept the default 'output' filename or enter your own.
The left/right mosaics produced will have '_l' and '_r' appended to the filename.
Choose 'Connect Selected Files' or 'Connect All Files'.
You may abort the mosaicing process by pressing the <ESC> key.
Image-strips will be extracted from the frames, mosaiced, saved as left/right pairs and displayed.
Change stereo mode to side-by-side, fit to screen and then anaglyph.
You can then use the left/right arrows keys to approximately set the window by overlapping the nearpoints of the images.
Choose 'View/Panorama Mode (360 degree)' and 'View/Fit Panorama Height to screen'.
(for panoramas created from 640x480 movies, it may be better to display at 100% in a 'widescreen' format).
Finally, choose 'View/Horizontal autoscroll for panorama' to view a continuously-rotating, 360 degree stereo panorama.
(If you can think of a suitable mnemonic, a faster way of doing the above is to press 'PQI' keys).
Press the <ESC> key to stop the auto-rotation.

You may now decide to run Mosaic again with strips from a different position to increase or decrease disparity.
In addition, if there is an obvious brightness difference between the last and first frames, check the 'Auto Color Adjustment' option and choose
the first or last frame as the brightness reference.
Those options (shown above) are only displayed when you choose to open images from a slideshow list.
You may save the adjusted images in BMP or PNG format for further editing (such as sharpening or selective brightness/contrast) before saving the 'working' images in JPG format.
Das oben dargestellte Panorama kann hier betrachtet werden.
Der Titel ist "Sandkasten, von Maes Mynan, North Wales" und es wurde mit einer digitalen Kamera im Film-Modus erstellt.